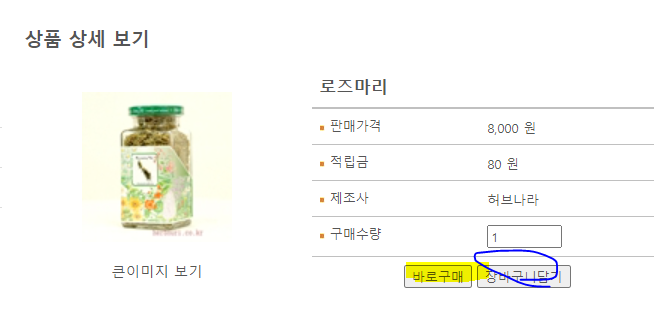
productDetail 에서
장바구니 = > cart 에 담기
주문하기 = > order 에 담기
▶ productDetail.jsp
- body
  <form name="frmPd" method="post">
         <!-- 상품명 -->
         <p class="line2">
            <span class="boldF">
               ${vo.productName }
            </span>
         </p>
         <p class="line"><span class="sp1">
         <img src="<c:url value='/images/dot2.JPG'/>"> 판매가격</span>
            <span>
               <fmt:formatNumber value="${vo.sellPrice }" pattern="#,###"/>
            원 </span>
         </p>
         <p class="line"><span class="sp1">
         <img src="<c:url value='/images/dot2.JPG'/>"> 적립금</span>
            <span>${vo.mileage } 원</span>
         </p>
         <p class="line"><span class="sp1">
         <img src="<c:url value='/images/dot2.JPG'/>"> 제조사</span>
            <span>${vo.company }</span>
         </p>

         <p class="line"><span class="sp1">
         <img src="<c:url value='/images/dot2.JPG'/>"> 구매수량</span>
            <label for="qty">
            <input type="text" name="quantity" id="qty" value="1" ></label>
            <input type="hidden" name="productNo" value="${vo.productNo }">
         </p>
         <p class="center">
            <input type="button" value="바로구매" class="buttons" id="order">
            <input type="button" value="장바구니담기"
            	class="buttons" id="cart">
         </p>
      </form>
- script
<script type="text/javascript">
	$(function(){

	   $('.buttons').click(function(){
		  if($('#qty').val().length<1){
			  alert('수량을 입력하세요');
			  $('#qty').focus();
			  return false;
		  }

		  var type=$(this).attr('id');

		  $('form[name=frmPd]').prop('action',
	"<c:url value='/shop/cart/cartAdd?mode="+ type +"'/>");
		  $('form[name=frmPd]').submit();

	   });
	});
</script>
= > class = buttons 를 누르면
1. 수량 유효성검사를 하고 수량이 0이면 "수량을 입력하세요"
아니면 class = buttons 의 id 값을 읽어서 변수 type 에 넣는다
2. name = frmPd 인 form 의
action 속성에 mode(order || cart) 를 넘기는 url 을 담는다
3. 2번에서 지정한 action 경로로 submit 된다
▶ controller
- 매개변수에 아이디와 cartVO를 넣어서
해당 아이디를 가진 유저의 장바구니 리스트를 생성하는 메서드
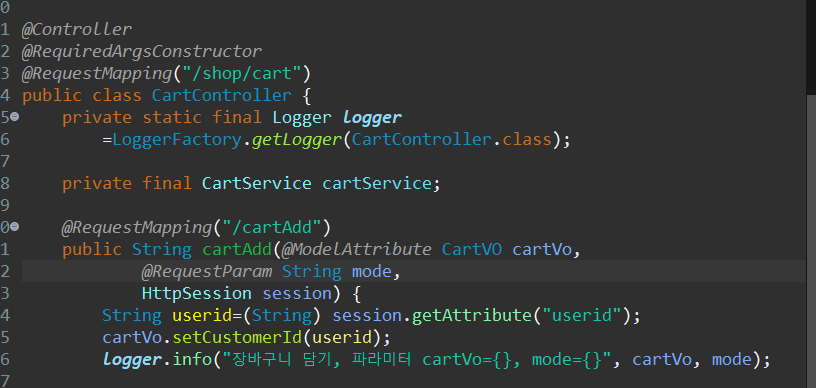
- 뷰에서 보낸 mode 를 받는다
- 세션에서 아이디를 받는다
- cartVo 의 userid 변수에 세션아이디를 set 한다
▶ cart xml
- xml 에는 3개 쿼리가 필요하다
- 1. 해당 유저의 장바구니에 해당 상품의 존재여부 check
2. 존재하면 update 로 수량만 올려줌 quantity=quantity + #{quantity}
3. 존재하지 않으면 insert 로 장바구니에 추가해줌
<select id="selectCartCount" parameterType="cartVo"
		resultType="int">
		select count(*) from cart
		where customerId=#{customerId} and productNo=#{productNo}
	</select>

	<insert id="insertCart" parameterType="cartVo">
		<selectKey keyProperty="cartNo" resultType="int"
			order="BEFORE">
			select cart_seq.nextval from dual
		</selectKey>
		insert into cart(cartNo, customerId, productNo, quantity)
		values(#{cartNo}, #{customerId}, #{productNo}, #{quantity})
	</insert>

	<update id="updateCartQuantity" parameterType="cartVo">
		update cart
		set quantity=quantity + #{quantity}
		where customerId=#{customerId} and productNo=#{productNo}
	</update>
▶ DAO, SERVICE 세팅하기
▶ ServiceImpl
@Service
@RequiredArgsConstructor
public class CartServiceImpl implements CartService{
	private final CartDAO cartDao;

	@Override
	public int insertCart(CartVO vo) {
		int count=cartDao.selectCartCount(vo);
		int cnt=0;
		if(count>0) {
			//해당 상품이 장바구니에 이미 존재하면 수량 수정
			cnt=cartDao.updateCartQuantity(vo);
		}else {
			//존재하지 않으면 입력
			cnt=cartDao.insertCart(vo);
		}

		return cnt;
	}
1. 장바구니 목록을 조회해서
if 해당 상품이 이미 존재하면 update
else 존재하지 않으면 insert 를 해준다
= > insertCart 메서드 하나로 다 check 가능
▶ Controller
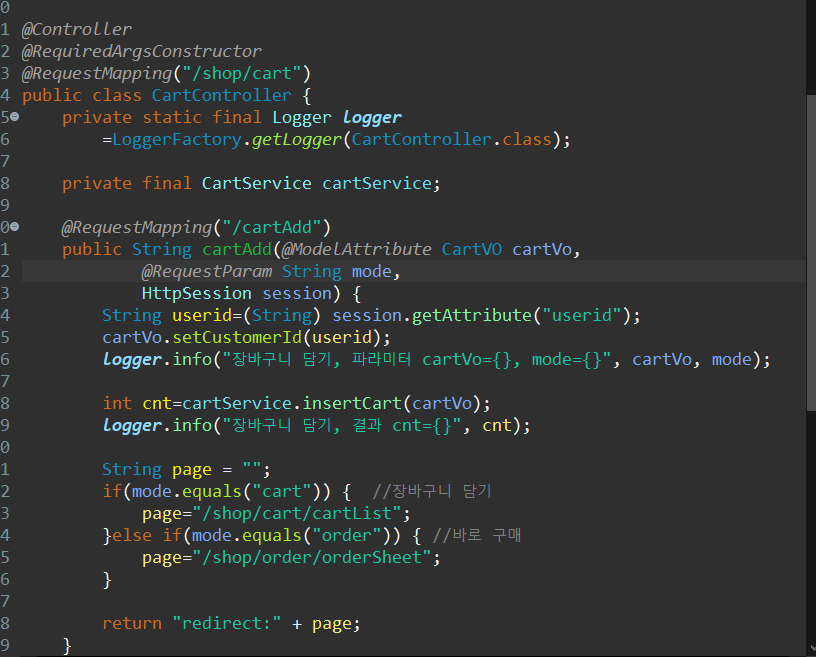
= > 이렇게 cartVo를 db 에 update || insert 해준후에
파라미터 mode 가 cart 면 cartList 로 redirect 해서 장바구니 리스트를 보여주고,
order이면 orderSheet 로 이동해서 장바구니에 담긴 목록을 바로 구매할 수 있게 처리한다
장바구니에 넣으면 장바구니 목록 보여주기
detail 에서 바로구매를 하면 mode = order => ordersheet.jsp 로 넘어가서 장바구니 추가 후 바로 주문할 수 있고,
장바구니담기를하면 mode = cart => cartList.jsp 로 넘어가서 장바구니 추가 후 장바구니 목록을 볼 수 있다
후자 케이스에 대한 내용이다.
장바구니에 저장은 다 된 상황 (상기내용)
redirect:/shop/cart/cartList 로 바로 controller 로 넘어옴
▶ Controller
- 고객 아이디로 장바구니 리스트를 조회해야하니까
매개변수로 session 이 필요하다

▶ xml
- 해당 유저의 장바구니 리스트는 넣을 수 있는 vo가 없다 !
=> 따라서 vo 와 같은 역할을 하는 map 을 resultType 으로 잡는다
	<select id="selectCartList" parameterType="string" resultType="map">
		SELECT * from cartview
		where customerid=#{customerId}
	</select>
=> 전체 장바구니 리스트중 id 가 #{customer} 인 유저의 장바구니 리스트만 select 하는 쿼리
▶ DAO, SERVICE,SERVICEIMPL
@Mapper
public interface CartDAO {
	List<Map<String, Object>> selectCartList(String customerId);

}
@Service
@RequiredArgsConstructor
public class CartServiceImpl implements CartService{
private final CartDAO cartDao;
@Override
	public List<Map<String, Object>> selectCartList(String customerId) {
		return cartDao.selectCartList(customerId);
	}
}@Override
public List<Map<String, Object>> selectCartList(String customerId) {
return cartDao.selectCartList(customerId);
}
▶ Controller
selectCartList 메서드를 통해 장바구니 리스트를 select 해서 list<Map> 으로 받는다
list , 배송비, 기준구매금액을 model 에 addAttribute로 담아서 cartList 로 보낸다
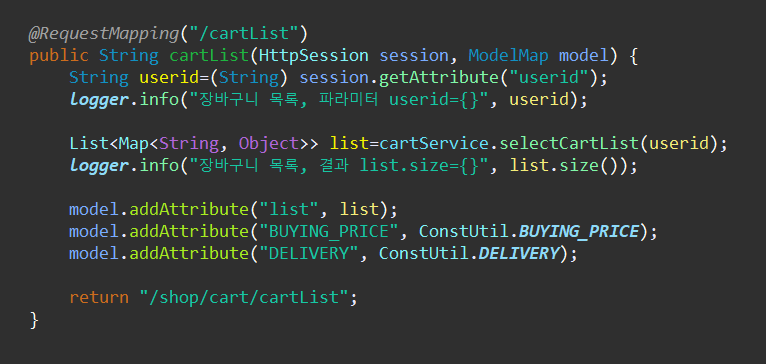
- constUtil
▶ cartList .jsp 뷰

map 을 list 로 꺼내서
map의 상품금액 *(곱하기) map 의 수량
한 값을 sum 에 넣는다
table 에 어떻게 set 되는지 td 한개씩 살펴보자
<c:forEach>
1. map 의 이미지와 상품명 꺼내서 set
<td>
    <img src
    ="<c:url value='/pd_images/${map["IMAGEURL"]}'/>" alt="${map['PRODUCTNAME'] }" width="50" align="absmiddle">
    ${map['PRODUCTNAME'] }
</td>
2. map 의 금액 꺼내서 fomat 설정하여 set
<td class="align_center">
	<fmt:formatNumber value="${map['SELLPRICE'] }" pattern="#,###"/>원
</td>
3. map 의 수량 가져와서 set
<td>
    <form name="frmCart" method="post" action="">
        <input type="text" name="quantity" size="5"
            value="${map['QUANTITY'] }">
        <button id="btEdit">수정</button>
    </form>
</td>
4. 장바구니 리스트의 총 합계금액 (sum : 위에서 상품금액 *(곱하기) map 의 수량 로 값 구한것) format 맞춰서 set
<td class="align_center">
    <fmt:formatNumber value="${sum}"
        pattern="#,###"/>원</td>
<td><a href="#">삭제</a></td>
5. buyingPrice 와 sum을 더한 총 결제예정금액을 buyingPrice 이라는 변수에 set
<c:set var="buyingPrice" value="${buyingPrice + sum }"/>
</c:forEach>
이렇게 하면 내 장바구니 리스트를 보여주는 for 문 작성이 완료된다.
이제 장바구니 최종 주문정보를 set 해보자


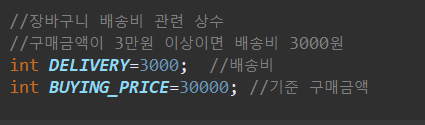
만약 총 구매금액이 model.Attribute 로 날린 BUYING_PRICE(30000) 보다 작으면
변수 delivery 는 model.Attribute 로 날린 DELIVERY
// 크면 자동으로 delivery 는 0 으로 set 되겠즁
이렇게 set 된 buyingprice 와 delivery 금액을 합쳐서 totalprice 로 다시 set 한 다음에
보여주기 !
	<c:set var="totalPrice" value="${buyingPrice + delivery }"/>

			<tr>
				<td colspan="4" class="align_right" style="border-right: none">
					총 구매금액 : <br>
					배송비 : <br>
					총 주문합계 :
				</td>
				<td class="align_right" style="border-left: none">
					<fmt:formatNumber value="${buyingPrice}"
							pattern="#,###"/>원 <br>
					<fmt:formatNumber value="${delivery}"
							pattern="#,###"/>원 <br>
					<fmt:formatNumber value="${totalPrice}"
							pattern="#,###"/>원
				</td>
			</tr>
'Spring' 카테고리의 다른 글
| [Spring] AOP 동작원리 : 리플렉션, JDK 동적 프록시 (2) | 2025.06.12 |
|---|---|
| [Spring] 디자인 패턴 : 적은 코드 수정으로 공통 로직을 작성하기 (0) | 2025.06.11 |
| [Spring] 게시판 예제 / 이벤트 상품별로 분류하기 / 선택한 체크박스만삭제하기 (0) | 2022.06.14 |
| [Spring] 스프링 작업 순서 / 나를 위한 기초 다지기 (0) | 2022.06.10 |
| [Spring] 파일업로드 / 다운로드 (0) | 2022.06.02 |