※ 오라클 developer - JAVA eclipse 연동하기
와 ! 연동하다가 울뻔했다. 구글링해도 자료 없었다.
공공의 이익을 위해서. 올린다.
C:\app\EZEN\product\18.0.0\dbhomeXE\jdbc\lib 경로에서
ojdbc 8 복사해서
C:\Java\jdk1.8.0_321\jre\lib\ext 여기에 붙여넣기
시스템 설정 > 고급 > 환경변수 > classpath 편집 들어가서
%classpath%;.;C:\Java\jdk1.8.0_321\jre\lib\ext\ojdbc8.jar
환경변수 셋팅하기
이클립스 > 프로젝트 이름 우클릭 > build path > configure build path >
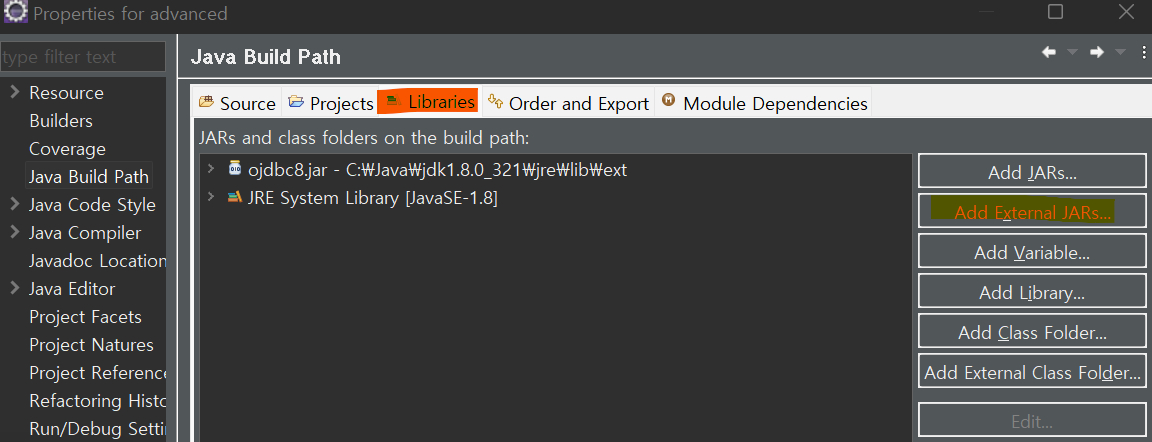
우측에 Add External JARs > C:\Java\jdk1.8.0_321\jre\lib\ext 경로에 넣어뒀던 ojdbc 8 파일 열기 apply
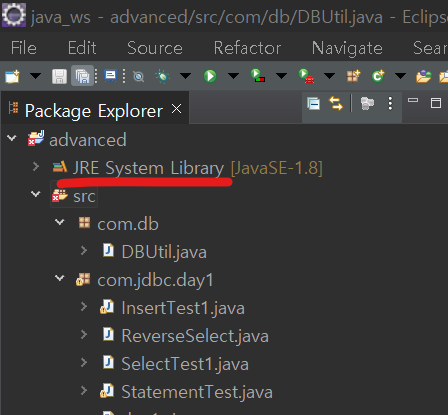
△ 이렇게 프로젝트 아래에 JRE System Library 가 들어와있으면 완료
JDBC란 ?
- (Java Database Connectivity)
자바 프로그램과 데이터베이스를 연결하는 프로그래밍 방식
자바언어로 데이터베이스에 접근할 때 사용되는 API
java 프로그램은 JDBC를 통해 데이터베이스에 연결하여 데이터를 검색하고, 입력, 수정, 삭제할 수 있다.
※ ★★★ JDBC 프로그래밍 순서
1) 데이터베이스와 연결하는 드라이버 클래스 찾기(드라이버 로딩)
2) ( 드라이버 클래스를 통해 데이터베이스 서버와 연결하는 Connection객체 생성 )
3) ( 작업을 처리할 Statement, PreparedStatement, CallableStatement 객체 생성 )
4) ( Statement/PreparedStatement를 통해 쿼리문 전송(실행) )
5) ResultSet 객체를 통한 Query 결과 처리
6) 접속 종료(자원 반납)
1. 드라이버 로딩
- 드라이버라는 문자열을 클래스화시켜서 메모리에 로딩
oracle.jdbc.driver.OracleDriver
2. 데이터베이스 서버에 연결하기 위한 Connection 객체 생성
- Connection : 데이터베이스 접속을 수행하는 객체
- DriverManager : 드라이브 관라자 클래스
Connection con = null;
String url = "jdbc:oracle:thin:@본인시스템이름:1521:xe";
String user = "접근할 계정", pwd = "계정의 비번";
con = DriverManager.getConnection(url, user, pwd);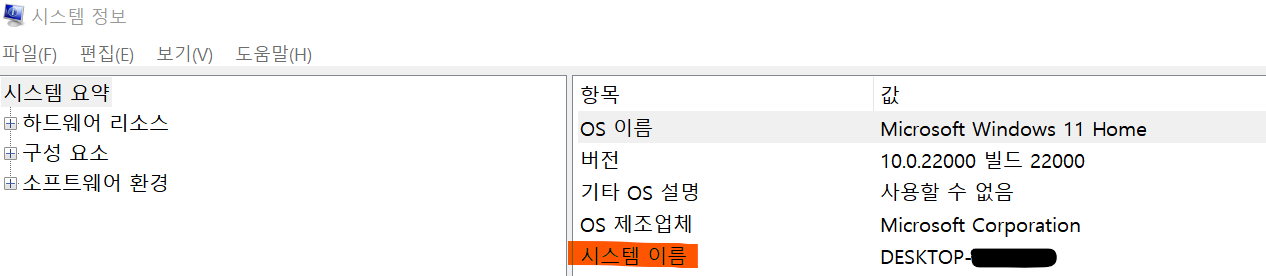
시스템 이름은 이렇게 찾으면 됨
3. sql문을 처리하기 위한 PreparedStratement 객체 생성
- PreparedStratement 객체 : sql 문장을 데이터베이스에 전달시켜 실제 그 내용과 동작 등을 수행하는 객체
PreparedStatement ps = null;
String sql = "오라클에서 수행할 명령";
ps = con.prepareStatement(sql);
4. 실행
[1] executeUpdate : insert, update, delete 관련 구문에서는 반영된 레코드의 건수를 반환
CREATE / DROP 관련 구문에서는 -1 을 반환
[2] executeQuery : 수행결과로 ResultSet 객체의 값을 반환. 따라서 ResultSet 객체에 결과값을 담는다
select 구문을 수행할 때 사용
int cnt = ps.executeUpdate();
System.out.println("처리된 행의 개수 : "+cnt);
try catch 문
5. 지원해제(접속 종료)
SQLException : SQL Server에서 경고 또는 오류를 반환할 때 throw되는 예외. 이 클래스는 상속될 수 없다.
- printStackTrace : 메세지가 자세하기때문에 디버깅할때 유용하다
try {
        if (ps!=null) ps.close();
        if(con!=null) con.close();
    }catch(SQLException e) {
        e.printStackTrace();
			}
[참고]
https://m.blog.naver.com/PostView.naver?isHttpsRedirect=true&blogId=pjm5111&logNo=220695374400
https://m.blog.naver.com/skfnsid123/221779925428
자 대략 프로그래밍 순서 틀은 위와같다
예제를 통해서 상황별 코드를 분석해보자 아좌잣
▶ java 에서 오라클 테이블에 insert 해보기
public class SelectTest1 {
	public static void main(String[] args) {

		Connection con = null;
		PreparedStatement ps = null;
		ResultSet rs = null;

		try {
			//1.드라이버 로딩
			Class.forName("oracle.jdbc.driver.OracleDriver");
			System.out.println("드라이버 로딩 성공");


			//2.데이터베이스 서버에 연결하기 위한 Connection 객체 생성
			String url = "jdbc:oracle:thin:@-------------";
			String user = "javauser", pwd = "-----";
			con = DriverManager.getConnection(url,user,pwd);
			System.out.println("db연결 성공");


		    //3. sql문을 처리하기 위한 PreparedStatement객체 생성
	         String sql="select * from person order by no desc";
	         ps=con.prepareStatement(sql);

	         //4. 실행
	         rs=ps.executeQuery();
	         while(rs.next()) {
	            int no=rs.getInt(1);
	            //int no=rs.getInt("no");

	            String name=rs.getString("name");
	            String tel=rs.getString("tel");
	            Date regdate = rs.getDate("regdate");
	            Timestamp regdate2 = rs.getTimestamp(4);

	            System.out.print(no +"\t");
	            System.out.print(name +"\t");
	            System.out.print(tel +"\t");
	            System.out.print(regdate +"\t");
	            System.out.print(regdate2 +"\n");
	         }
	      } catch (ClassNotFoundException e) {
	         e.printStackTrace();
	      } catch (SQLException e) {
	         e.printStackTrace();
	      }finally {
	         try {
	            if(rs!=null) rs.close();
	            if(ps!=null) ps.close();
	            if(con!=null) con.close();
	         } catch (SQLException e) {
	            e.printStackTrace();
	         }
	      }
	   }
	}
데이터베이스 접속을 수행하는 Connection 객체
sql문을 처리하기 위한 PreparedStratement 객체
executeQuery 의 결과값을 담는 ResultSet 객체는
catch 문 밖에서 선언해준다.
1,2 는 딱히 코드해석할거 없고
3. sql 에서 수행할 코드(select 문) 를 PreparedStratement 에 넣어준다
- ORACLE developer 에서 먼저 수행보고 (오류를 줄일 수 있음)
정상적으로 작동하면 ; 를 제거하고 가져온다
4. select 문을 수행(executeQuery)하고 ResultSet 객체에 결과값을 담는다.
String name=rs.getString("name"); 에서 name 은 가지고올 컬럼명. 혹은 컬럼의 순서를 숫자로 입력해도 된다
Timestamp regdate2 = rs.getTimestamp(4); <= 이렇게 !
▶ 사용자에게 값을 받아서 insert
public class InsertTest1 {
	public static void main(String[] args) {
		//insert
		Scanner sc = new Scanner(System.in);
		System.out.println("이름, 전화번호 입력!");
		String name = sc.nextLine();
		String tel = sc.nextLine();


		Connection con = null;
		PreparedStatement ps = null;
		try {
			 //1. 드라이버 로딩
			Class.forName("oracle.jdbc.driver.OracleDriver");
			System.out.println("드라이버 로딩 성공");

			//2. 데이터베이스 서버에 연결하기 위한 Connection 객체 생성
			String url = "jdbc:oracle:thin:@----------";
			String user = "javauser", pwd = "------";
			con = DriverManager.getConnection(url, user, pwd);
			System.out.println("db연결 성공 !");

			//3.sql문을 처리하기 위한 PreparedStratement 객체 생성
			String sql = "insert into person(no, name, tel)"
					+ "values(person_seq.nextval, ?,?)";
			ps = con.prepareStatement(sql);

			//in parameter setting
			ps.setString(1,name);
			ps.setString(2,tel);


			//4.실행
			int cnt = ps.executeUpdate();
			System.out.println("처리된 행의 개수 : "+cnt);
		} catch (ClassNotFoundException e) {
			e.printStackTrace();
		} catch (SQLException e) {
			e.printStackTrace();
		}finally {

			//5. 지원해제(접속 종료)
			try {
				if (ps!=null) ps.close();
				if(con!=null) con.close();
			}catch(SQLException e) {
				e.printStackTrace();
			}
		}
	}
}
3. 입력될 컬럼명을 ? 로 바꿔놓고
in parameter setting 으로 값을 넣어준다
4. ClassNotFoundException : 프로그램 실행 중 객체를 생성할 때 클래스를 찾지 못하면 발생하는 Exception
▶ 테이블 전체 select
public static void main(String[] args) {

		Connection con = null;
		PreparedStatement ps = null;
		ResultSet rs = null;


	// 1,2,3 생략


			//4.sql문을 처리하기 위한 PreparedStatement객체 생성
			boolean bool = ps.execute();
			if(bool) { // select 문
				rs = ps.getResultSet();
				while (rs.next()) {
					int no = rs.getInt(1);
					String pdName = rs.getString(2);
					int price = rs.getInt(3);
					Timestamp regdate = rs.getTimestamp(4);

					System.out.println(no +"\t" + pdName+"\t"+price+"\t"+regdate);
				}
			}
		} catch (ClassNotFoundException e) {
			e.printStackTrace();
		} catch (SQLException e) {

		}finally {
			try {
				if(rs!= null)rs.close();
				if(ps!= null)ps.close();
				if(con!= null)con.close();
			} catch (SQLException e) {
				e.printStackTrace();
			}
		}
execute() : 반환타입이 boolean
- 모든 구문 (sql 문장) 을 실행시킴
- select 문이면 true, select 문이 아니면 false 를 리턴함 ( ResultSet 객체에 결과값을 담는것은 불가 )
▶ create 시퀀스 , 테이블 ( 2개 수행할때 )
public class ExecuteTest1 {
	public static void main(String[] args) {
		Connection con = null;
		PreparedStatement ps = null;

	//1,2 생략

		//3.sql 문을 처리하기 위한 PrepraredStratement 객체 생성
		String sql = "create table pd2"
				+ "("
				+ " no number primary key,"
				+ " pdName varchar2(50) not null,"
				+ " price number null,"
				+ " regdate  date default sysdate"
				+ ")";
		ps=con.prepareStatement(sql);

		//4.실행
		boolean bool = ps.execute(); // false
	System.out.println("bool = "+ bool);


		//sequence 생성 sql 문
		sql = "create sequence pd2_seq"
				+ " start with 1"
				+ " increment by 1"
				+ " nocache"; // 공백을 주어야 입력될때 띄어쓰기가 됨

		ps = con.prepareStatement(sql); //또 실행할꺼임

		bool = ps.execute();
		System.out.println("seq생성 = bool: "+bool);// false : select 가 아님

		System.out.println("pd2 테이블 생성 성공!");
		} catch (ClassNotFoundException e) {
			e.printStackTrace();
		}catch(SQLException e) {
			e.printStackTrace();
		}finally {
			try {
				if(ps!=null) ps.close(); //먼저 생성 후 try catch 문 걸기
				if(con!=null) con.close();
			} catch (SQLException e) {
				e.printStackTrace();
			}
		}
	}
}
// 시퀀스 생성할때 보면
테이블 생성하고 한개 더 생성하니까
ps=con.prepareStatement(sql); 를 한번 더 썼다
▶ insert 프로시저 가져와서 사용해보기
- 프로시저 가져올때는 콜콜콜 !
- call 이 3번 사용됨
- exec personInsert ('최길동','010-4321-4321') 형태로 입력되는 프로시저 사용할꺼임
public static void main(String[] args) {
		Scanner sc = new Scanner (System.in);
		System.out.println ("이름, 전화번호 입력!");
		String name = sc.nextLine();
		String tel = sc.nextLine();

		Connection con = null;
		CallableStatement cs = null; // 프로시저 에서만 사용

		//1.
		try {

			Class.forName("oracle.jdbc.driver.OracleDriver");
			System.out.println("드라이버 로딩성공");

			String url = "jdbc:oracle:thin:@DESKTOP-6SB7020:1521:xe";
			String user = "javauser", pwd ="javauser123";
			con = DriverManager.getConnection(url, user ,pwd);
			System.out.println("db연결 성공");


			//3.
			String sql = "call personInsert(?,?)";
			cs = con.prepareCall(sql);


			//in parameter setting
			cs.setString(1, name);
			cs.setString(2, tel);


			//4
			boolean bool = cs.execute();
			System.out.println("프로시저 실행 결과 :"+ bool);

		} catch(ClassNotFoundException e) {
			e.printStackTrace();
		} catch(SQLException e) {
			e.printStackTrace();
		}finally {
			try {
				if (cs != null) cs.close();
				if (con != null) con.close();
			}catch (SQLException e) {

			}
		}
	}
}
1 call : CallableStatement cs = null; // 프로시저에서만 선언
2 call : exec personInsert ('최길동','010-4321-4321') => String sql = "call personInsert(?,?)"
- exec를 call 로 변경했다
3 call : cs = con.prepareCall(sql);
▶ 사용자에게 값 입력받아서 out 매개변수 프로시저를 이용해 select 해보기
- 솔직히 이거 뭔지 좀 헷갈림
아니 그냥 모르겠어요
▽사용할 프로시저
create or replace procedure infoProf_proc
		   (v_profno in professor.profno%type,
			v_name out professor.name%type,
			v_pay out professor.pay%type)
is
begin
select name, pay into v_name, v_pay
from professor
where profno=v_profno;
end;
Scanner sc = new Scanner(System.in);
System.out.println("교수번호 입력!");
int profno =sc.nextInt();
Connection con = null;
CallableStatement cs = null;
try {
//1
Class.forName("oracle.jdbc.driver.OracleDriver");
System.out.println("드라이버 로딩 성공");
//2
String url = "jdbc:oracle:thin:@DESKTOP-6SB7020:1521:xe";
String user = "hr", pwd ="hr123";
con = DriverManager.getConnection(url,user,pwd);
System.out.println("db연결 성공");
//3
String sql = "call infoProf_proc(?,?,?) ";
cs = con.prepareCall(sql);
cs.setInt(1, profno);
cs.registerOutParameter(2, oracle.jdbc.OracleTypes.VARCHAR);
cs.registerOutParameter(3, oracle.jdbc.OracleTypes.NUMBER);
//registerOutParameter: out 파라미터 등록
boolean bool = cs.execute();
System.out.println("bool = "+ bool);
String name = cs.getString(2);
int pay = cs.getInt(3);
System.out.println("이름:"+name+", 급여:"+pay);
} catch (ClassNotFoundException e) {
e.printStackTrace();
}catch (SQLException e) {
e.printStackTrace();
}finally{
try {
if(cs!=null) cs.close();
if(con!=null) con.close();
} catch (SQLException e) {
e.printStackTrace();
}
}
}registerOutParameter: out 파라미터 등록
'JAVA' 카테고리의 다른 글
| [JAVA] AWT (0) | 2022.04.05 |
|---|---|
| [JAVA] DTO / DAO (0) | 2022.04.04 |
| [JAVA] 형식화클래스 / Math 클래스의 메서드 / StringBuffer / StringTokenizer / 연산자 == (0) | 2022.03.15 |
| [JAVA] TreeSet / String , Calendar, Date 클래스의 메서드 (0) | 2022.03.13 |
| [JAVA] HashSet / HashMap / ArrayList를 매개변수로 넣은 메서드 / Properties 클래스 (0) | 2022.03.10 |